Do you have room to breathe? Country living doesn’t stop many of us from being busy, busy, busy and stressed, stressed, stressed.* We don’t smell the roses, let alone take time for friends and family or go for walks across the fields, on the beach or in the mountains.
If you declutter and simplify your home, would it really help and make your life easier?
Yes.
In a word, yes.
And it might do a few other things too.
[* It’s the same for town and city living, of course.]
Declutter and simplify and you’ll have more time
Having time is one of the greatest luxuries today. It’s become a precious commodity and it flies, whether you’re having fun or not.
When you’ve simplified your house a little or a lot, you’ll have time for other things. You’ll be able to spend time on things you want to do, without being in a perpetual rush. You might even have time for a big rush that you won’t forget at Rib Ride or Zip World!
You’ll be able to just get to the beach or out for a walk without forgetting something – dog lead, keys, phone.
And the day-to-day routine of (select and add as appropriate) animals, garden, school, shopping, work and perhaps hospital visits will be simply easier. Easier sounds good to me.
You’ll feel much better
Like many people who’ve decluttered and simplified their home, you’ll feel so much better. This is what they say.
I feel more in control of my own life now.
I feel calmer. I’m not so stressed.
The house is cleaner because there isn’t so much stuff.
I’ve saved money because I don’t buy duplicates any more. I know where everything is. And I’ve found money too!
I enjoy what I’ve got because I can actually see it clearly now.
Declutter and simplify and you’ll have more space and more choice
When you’ve decluttered, there’s going to be less mess and more space. How wonderful to be able to find what you want!
And, strangely, having fewer things seems to offer more choice. That’s more choice in what you do with your time, your money, your life!
If things aren’t going right for you, don’t add things. Instead of adding things, you could try taking things away. People say that this helps them to focus on what’s really important.
You’re convinced? What next?
It is worthwhile to take the time to declutter and simplify your home. Or, indeed, anywhere you live.
Given half a chance, sports and fitness kit will sprawl about all over the place. This post is about deciding where and how to store all that stuff, much of which will be wet or need washing when it comes back into the house. And much of which may be an awkward shape or large size (skis, helmets, climbing ropes, wetsuits, rackets, bats, balls and so on and so forth).
There are some questions to think about and some suggestions for storage. What you decide upon will depend on your needs and your situation, of course.
Questions to think about
Can your current system for storing sports and fitness kit be improved by a few tweaks or even rethinking things entirely?
For me, the key is finding a space (for washing, drying, storing) and using it as much as you can. Getting things put away as soon as possible makes a big difference. I do know it can be much easier said than done, though, especially in a small house.
Have you got somewhere to wash and dry things? Is it possible to set somewhere aside – a garage, a shed, a conservatory, a lean-to? A corner of the kitchen? Just by the front door?
Are some things always being used so they are never put away? Swimming or running kit, perhaps, or foul weather gear? Where do they live?
When will you need this bit of kit again? Are you putting it away just for a few days or for the season? Does it need mending or other maintenance? Should it be kept away from any damp?
Do you have any space up above?
I do like using this kind of space.
Put a bike on a pulley and hoist it up and away in a high hallway.
Suspend a sea kayak and a surf boat from the apex of the garage like Beeswax Fabric Wraps and bushcraft and expedition leader Ynys Twca do. Use a sling to do this with skis and other long things.
Install poles across the apex of the garage to take long items, or planks to make a platform.
The loft or the attic – that’s where I keep my XC skis.
Doodly Dog’s running shoes have their own dedicated shelves
Dedicated shelves, like animator Doodly Dog uses for his running shoes.
Cubby hole type storage.
Hooks – good for wetsuits and for all those different helmets.
A pegboard – great for seeing what you’ve got at a glance.
And underneath, range kettlebells and dumbbells along the wall in weight order. Keep them out of the way, so you don’t stub your toes.
Sports and fitness kit inside
Putting kit into boxes or other containers will keep it under control. Label the containers so you don’t even have to think about where things are.
Fold your tops and store them vertically in a container – like a filing system. Padded cycling tights, for example, can be difficult to store but this keeps them in order.
Corral your bike gear in a box.
Have a bin in the hallway with cricket pads and bats, squash and tennis rackets, hockey sticks and all the rest in it. I’ve seen these bins in hallways and in downstairs loos and in garden rooms. Yes, you sometimes have to move past them very carefully but the kit is under control and is accessible.
Repurpose furniture. A wardrobe can be a very successful home for climbing gear. Take the doors off old cupboards for open access shelves.
Big see-through plastic containers are great for clothing that’s not being used this season or even this year. Remember to make sure that the clothing is clean before you store it, and label the container.
Those big see-through plastic containers are also great for assorted fitness equipment – and will sometimes slide under the bed.
Perhaps you can store sports and fitness kit and equipment outside
Here are four suggestions.
The car boot. That’s marketing expert ie instinct’s solution for gymn kit so it’s ready for her to use at the drop of a hat.
In the van. This can be especially good if you spend some time making racking to fit inside so you can store things neatly in boxes on shelves, like Outdoor Active does. He’s in education and exploration and needs to keep on top of all the kit.
Leaning against the house, if it’s going to be safe and secure.
In an open-fronted barn – lots of scope here.
Keep like with like
It’s a great idea to keep similar things together but you’ve got to decide what’s possible in your home and what makes sense for you. However good an idea it might be, you might not be able to keep everything to do with one sport together.
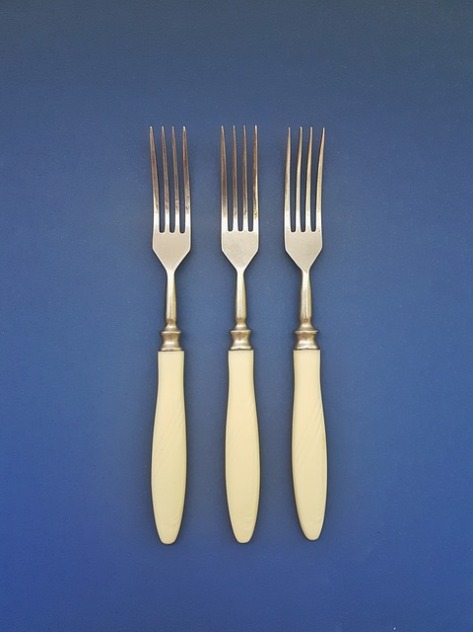
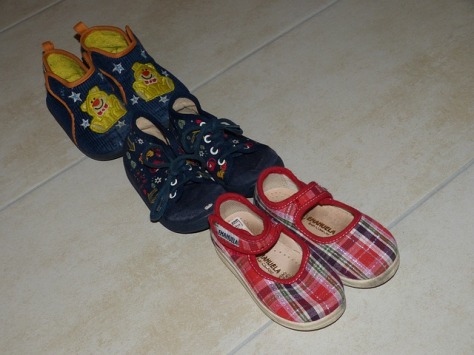
Do you keep trainers with other footwear? I do but I know not everyone does.
Do you keep all your fitness tops with your other tops? And your sports shorts and trousers with other trousers?
What about swimming things, if they’re not always being used?
Rationalise and declutter your sports and fitness kit
Are there things you no longer use and that someone else could benefit from? Make space by passing them on via charity shops, organisations or sales.
Llanberis Mountain Rescue, for example, have an outdoor kit car boot sale every six months. The pitch fee goes to them and the proceeds of sales goes to the stall holder. You’ll meet some interesting people and old friends, and perhaps make new friends.
And relax
You’ve been out on the hill. Or the beach or the water or the back roads. In the gymn or the studio. And now you’re home. Where do you put your kit?
Thanks very much to everyone who’s shared their brilliant kit and caboodle solutions over the years.
Five reasons it’s worth paying a professional organiser and declutterer?
But I should be able to do it myself!
Well, maybe, but so often things at home and at work seem to conspire to get in the way.
It can be worth paying a professional organiser and declutterer like Uncluttered Wales to work with you. Together, you’ll get your job done – making a bit of space, downsizing, organising or whatever!
So here are five reasons a professional organiser in your life is well worthwhile.
You’ll be supported as you make a start and have company as we work together
Reason 1 – Getting started is often the hardest step to take and it’s very common to get stuck before you begin. A professional organiser will help you get the ball rolling.
Stuff! We understand how easily it can build up. And we understand how overwhelming it can be to sort through it.
We’ll talk about what you want to achieve and how to do it. Then we’ll make a start.
Getting the ball rolling
Reason 2 – You’ll have friendly and non-judgmental company and support as we work together.
It’s completely confidential.
We know that decluttering and organising can be hard emotional work. There may be difficult decisions to take. That’s why we’ll make sure that you’re comfortable with what we’re suggesting.
You’ll make good progress
Reason 3 – Distractions are tempting but a professional organiser will keep the work focussed and on track. So we’ll make good progress in our session. Another pair of hands helps too.
Paying a professional organiser is an investment
Reason 4 – A member of the Association of Professional Declutterers and Organisers, like Uncluttered Wales, is verified, insured and registered for data protection. APDO members are professional and follow industry standards.
Reason 5 – Look on a professional organiser’s assistance as an investment in your life.
Whatever your aim, within a very short space of time you’ll have moved much closer to where you want to be.
Working together
It’s worth thinking about
You’ll start with a plan. You’ll make good progress and reach your goal (or move a long way towards it). And it will be a friendly and supportive process.
A professional organiser is certainly worth thinking about.
Oh, yes, we’re into autumn now. The mornings are cooler – and the nights too! Soon the clocks will be going back. A spot of autumn decluttering and organising is well worth doing to get yourself straight for whatever comes along next. That’s because:
we’ll be spending more time indoors now and we need space
the weather will be much more changeable and
you’re going to need more clothes to hand – coats, hats, scarves, brollies and the rest
it’s going to be darker
the busy festive time is coming up later in the year and you’ll need the room.
Let’s be organised and prepared so we can enjoy the autumn and handle what it throws at us. This feels good.
Autumn weather can be lovely, so get out and enjoy it when you can! This feels good too.
Autumn decluttering – put things away
It’s really worthwhile putting away your summer and holiday things before you get your autumn and winter stuff out. Put these things away and you’ll have more space.
What am I talking about here? Well, clothes, for starters.
Although I wore a sleeveless top last week I’m pretty certain that I won’t be wearing it again this year. Give the summer and holiday clothes a wash and put them away – except that now is a good opportunity for a mini declutter. Those clothes that didn’t work this year are unlikely to work next year. Recycle or rehome them.
Clean your garden furniture and get it under cover so it doesn’t deteriorate, doesn’t look a mess and is ready to go when the warmer weather returns. Bonus points for cleaning the barbecue.
Clear up the outside toys. Once again, a bit of decluttering doesn’t go amiss here. If your children have outgrown toys you could pass them on. You’ll have that warm feeling from helping someone else. If some toys don’t work any more or are dangerous, then it’s time for them to go. Feel good for thinking about safety.
Get autumn and winter things out
Get out your winter clothes and check them over. Remember your hats, gloves and scarves, your brollies and your boots.
Find your torch and check the batteries (unless it’s a wind-up one, of course).
Break out the blankets for those draughty corners that almost every house seems to have. Mmm, cosy.
Autumn decluttering – tidy up inside and outside
Tidy up and you’ll have more mental space. Definitely.
It’s so much easier when there’s a place for everything. If you find something without its own place, try to give it a home. You know, somewhere sensible.
A little autumn tidying up in the garden will make an immediate difference, and it will really lift your spirits in bad weather.
Look ahead a little and make some preparations
Look ahead to the festive season and prepare a little. A bit of decluttering and preparation now means you won’t feel so swamped and overwhelmed, come December.
Look even further ahead to the spring. It is coming! Everyone loves spring-flowering bulbs so plant yours now.
You probably don’t have much time to read this so here are the basics about decluttering and organising kids’ clothes and toys.
Involve the children from the very beginning.
Give everything a home.
Label that home if necessary.
Reset (aka tidy up) every evening.
Now read on.
Give those piles of clothes a home
Drawers are a good place for clothes. Different ones for tops, bottoms, underwear, socks. You could label the drawers if that helps. Children like sorting so get them involved them.
Folded clothes take up less space. Take two or three deep breaths – not strictly necessary but it focuses your attention. Shake out each piece and fold it. It doesn’t have to be very very neat.
Outgrown clothes – put them in their new home, whether you’re keeping them for the next child, or passing them on to a friend, or giving them to charity. It’s the same routine. Shake out clean clothes, fold and put them in their new home. It could be:
• A big transparent box in the loft, labelled with something that makes sense to you. Trousers and tops 4-5 yrs. Wet weather + skiing 8-10 yrs. Something like that.
• A black bag for passing on to a friend or charity. Label it! You don’t want it going out with the rubbish.
Talk to your kids from the beginning about passing clothes on to other people. Perhaps clothes are already passed on them. ‘Passing clothes on’ is so much nicer than ‘getting rid of them’! You’ll all have a warm feeling knowing that your clothes are going to a good home and someone else (your cousin, a friend, a child you’ve never met) will enjoy wearing them. And it’s the same with toys.
Line up shoes in pairs
Categorise and curate toys and books
Broad categories help a lot so you don’t waste time micro-sorting when you’re tidying up. Books, puzzles, building blocks, cuddly toys – that kind of thing.
Get your children (however small) involved in deciding categories that fit in with how they play. They’ll feel a sense of ownership and that will pay off further down the line.
Some kids have so many toys they become overwhelmed. And so does the room or the house. Talk to them about putting some toys away for a while and bringing others out. Rotate them.
Just like clothes, chat about passing outgrown toys on to other children who might like to play with them. Like I said, you all get a warm feeling.
Give toys and books an easy place to call home
Kids get older and their interests change so think about storage that will still work in a few years. And you might like to label where things go.
Bookshelves are brilliant for books (obviously) but are also good for toys, clothes and other things.
Open-topped boxes work well as it’s easy to fling things in when you’re tidying up. They’re not hard to find or you could make your own like this repurposed box below.
Janka’s toys
Cube storage looks neat.
Wall-hung storage keeps things off the floor.
Dual-purpose furniture, such as beds with drawers, saves space.
Routine is your friend with kids’ clothes and toys
Have a routine where you and your child tidy up regularly at the end of every day. A five minute burst is quite doable for kids and you can get a lot done in that time.
Have you ever trodden on a plastic dinosaur in bare feet?
Get a good thing going
A good system will go a long way towards keeping things going through the summer holidays and beyond.
If you often race to get out of the door in time, then this post is for you. Be organised and try to make sure there is a place for everything. Tidy up after yourself when you come in. Plan ahead and get ready for leaving.
Read on for more detail.
Is this your scenario?
Tearing about the house with your heart thumping, followed by a rushed scramble for the door is not a good start to any journey. Halfway down the path, halfway down the road, you’re asking yourself ‘Have I got my [insert name of something essential]?’ ‘Did I pick up the [insert name of something else essential or perhaps even not essential at all]?’
There’s adrenaline all over the place, it seems, accidents happen and then you’re suddenly exhausted.
A smooth exit is altogether a better look, and it’s one to pull off again and again. Much better for your state of mind and your state of health too, come to that.
Let’s work out how to be organised and do it.
A place for everything …
You probably know this proverb:
A place for everything and everything in its place.
This has the potential to be a game-changer, even though it’s been around since at least the early 17th century. A place for everything and everything in its place gives you a strong foundation for smooth departures from the house.
You need a good place for these important items.
Keys. Some people have a bowl by the front door, a key rack or a key press.
Coats. A cupboard, the back of a door, a rail – whatever you’ve got, make sure you use it.
Bags. Put them on a shelf, a cupboard or a special bit of floor.
Packed lunch or snack things. You could use baskets or other containers, probably in the kitchen.
Your phone!
To get out of the house smoothly, it helps to get into the house smoothly
Even if all hell is breaking loose when you return to the house, take a few moments then (or slightly later when things have calmed down) to do the following.
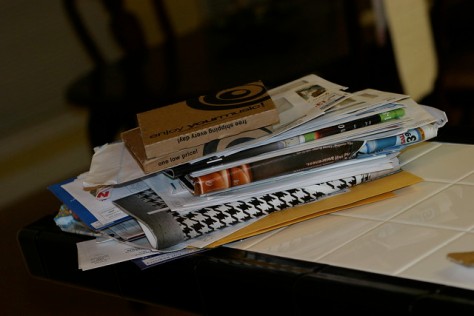
Pile of mail. Thanks to Charles Williams (CC BY 2.0).
Put the keys in their special place so you can find them. And the sunglasses too.
Put the shopping away.
Put your phone on to charge if the battery tends to run down quickly.
Be organised and have a system to process things (swimming stuff, for example) when they come back into the house.
Be organised and plan ahead
If you know you’re leaving the house tonight or tomorrow, run through what you’re going to need and get things ready in advance.
Do you need work or other special clothes? Choose them and lay them out or hang them separately. (I keep my decluttering clothes together, my gymn clothes together and so on. Having school uniforms together also helps a lot!)
Iron your clothes if you need to and clean your shoes.
Do you need to take a packed lunch, a water bottle or a portable cup for takeaway coffee? Get them ready.
Your ordinary bag, your briefcase, your gymn or swimming things, your library books? Anything else you need?
Have you got change for the bus or parking or a locker or a school trip? Don’t be caught out: not everything can be done with a card or a smartphone.
Lay the breakfast table the night before. It simplifies decision-making and cuts down on movement around the kitchen.
Maya helping to set the breakfast table. (Thanks to Amish Patel. CC BY-ND 2.0)
There you have it
How to be organised and get out of the door in good order. Even if there’s a last minute change of plan like I had this morning, laying these foundations will help you take off as smoothly as possible. Good luck!
Paperwork is the single most annoying thing in most people’s homes. In this post I’m going to tell you how to be a paper warrior and to keep it simple. We’ll cover stopping paper and paperwork getting into the house, keeping it all in one place and taking immediate action, and dealing with it once a week. We’ll also look at filing, and emergency action when it’s all got out of hand.
Pile of mail. Thanks to Charles Williams (CC BY 2.0).
Paper and paperwork? It’s a force of nature. It’s often unrequested, and it gets dropped and forgotten. It ends up in piles and heaps all over the house and attracts more clutter as it goes. We’re talking about forms to sign, magazines, junk mail, bills, catalogues, newsletters, newspapers, letters, postcards, lottery tickets, raffle tickets … And all the rest.
Yes, paperwork when it’s out of control is annoying. And piles of paper are the thing we notice most often in other homes – long before dusty corners or unwashed mugs and plates.
What’s more, paper and paperwork when it’s out of control is very unrestful. That’s because it’s unfinished business. How can anyone relax with unfinished business about? They can’t.
What a long way from the paperless paradise we heard about a few years ago. Time to be a paper warrior!
Be a paper warrior and be strategic
Take control. This is the only way to prevent paperwork becoming paper clutter.
1. Stop as much paper and paperwork as possible from getting into the house.
2. Put all the paperwork that does make it inside in one place. Deal with as much as you can immediately. Put the rest in your in tray.
3. Set a regular time to deal with your in tray.
4. Have a simple filing system and use it.
1. How to stop paperwork getting into the house
Prevent junk mail
You can stop quite a bit of junk mail from getting through your letterbox by registering with these four organisations:
Mail Preference Service – a service funded by the direct mail industry to remove consumers’ names and home addresses in the UK from lists used by the industry.
Royal Mail Door-to-Door – opt-out form. (Be aware that registering to opt out means that you will not receive leaflets from central and local government and other public bodies. This includes unaddressed voting and election material, and information about local recycling and so on.)
Review and reconsider
Review your subscriptions to newspapers and magazines. If you don’t read them then it’s time to stop them coming through the letterbox. You could consider a digital subscription.
Reconsider any magazines you buy in shops and from newsstands. Are they one-off or regular purchases? Once again, do you read them?
Manage your ‘paper and paperwork’ online
This is a good idea but, of course, it can generate more email. (Keeping that under control is a story for another day!)
Online, you can, for example:
manage your bank and other financial accounts
pay your council tax through a direct debit
manage your utility meter readings and bills
read magazines and newspapers
keep a ‘look book’ for design projects on Pinterest.
2. Keep all paperwork in one place and, if you can, deal with it immediately
All paperwork in one place
This will stop it from going walkabout in the house. Choose a place and use it. It doesn’t matter what you call it – ‘command centre’, ‘landing pad’, ‘my desk’ – put all your paperwork here and do that consistently.
The bridge, the nerve centre of a tugboat
Deal immediately with as much paper and paperwork as you can
This takes away paperwork’s power to clog up your head with unfinished business.
Recycle immediately – junk mail flyers, unwanted catalogues, takeaway menus, other adverts, free directories, spare envelopes etc etc etc.
Shred immediately – charity request letters and other junk mail with your name and address on.
Open letters (I use an old vegetable knife to do this quickly and easily). Recycle or shred the envelopes and anything else you can.
Do what you can straightaway. Then it’s done and out of the way and out of your head! Sign school permission slips and reply to invitations, send money to school or other places. Note any important dates. Once again, recycle or shred anything you can.
Put the rest in your in tray. This will probably be paperwork to think about, file, scan and so on. (By the way, you don’t have to use a tray. I like using one because it keeps things straight and I know I’m going to go through it at the end of the week. For some people it means that things get buried. Choose what makes sense to you.)
You can use whatever comes to hand as an in tray. Some people use this kind of paper tray. Some people use a cardboard box.
3. Set a regular time to deal with your in tray
Every successful paper warrior I’ve met sets a regular time to deal with their paperwork. It’s usually once a week and it becomes a habit. They focus on their in tray and whisk through it, quickly and effectively.
Work through your in tray.
Sort through it. I put similar things together so I’m dealing with them all at the same time and I don’t have to change gear.
Read paperwork.
Pay bills.
Reconcile accounts.
Write letters and cards.
Take action on anything else that requires your attention.
Recycle or shred what you can.
File what’s completed.
Some paperwork will need more information before you can deal with it. Other papers you may be undecided about. Put those back into the in tray for next time.
4. Your filing system
Know what paperwork you need to keep and for how long.
Have a filing system. Keep it simple.
Only file what you need.
Neat and tidy files make it easy to find paperwork again but you probably don’t need to keep as much paperwork as this …
What you need to keep
There are some papers to keep because they are essential and other papers to keep because they may make life much easier for you in the future.
Papers that are essential – for example, birth and marriage certificates, insurance policies, examination certificates.
Other papers to keep (and this depends on you and your circumstances) – for example, school reports, current passports, business documents, some financial documents.
Filing system
The main thing here is to make it easy for yourself, so choose a system that will be easy to use! You want to be able to file paperwork quickly and without fuss – and to find things again quickly and without fuss. Depending on your circumstances, you could choose a filing cabinet, a concertina file, a banker’s box (these are the right size for files or folders) or other boxes.
Thanks to Hiro (in the banker’s box) and Mitch Barrie for this image. CC BY-SA 2.0
Set up simple main categories that make sense to you, and label each folder or file accordingly. You could have one for each person in the house, each animal in the house, bank and other financial institutions, health, and business, for example. And each main category can be divided into sub-categories, if necessary.
5. Emergency action
This is for when your house is awash with a sea of paper. Or perhaps it’s the house of someone who is ill or has recently died. Emergency action is required.
Walk through each room and collect all the paper and paperwork. Put it into a bag or box.
Find a space where you can sort it. Sort all the paper and paperwork into three piles:
Anything you need to keep. You can get to this later.
To shred. That’s unwanted paperwork with names, addresses or financial details.
Recycling. That’s everything else.
Good luck with decluttering and organising, Paper Warriors!
This post is a bit of fun about decluttering and signs of the Zodiac but just might offer some insights …
Aries 21 March – 19 April
Aries, you know how enthusiastic, optimistic and active you are but sometimes your energy is scattered in different directions. When you’re decluttering, turn off your phone, stay centred and focus focus focus.
Taurus 20 April – 20 May
Taurus, you don’t like change, and some call you stubborn, but you can be practical and reasonable in difficult situations. You need to be surrounded by love and beauty. Looking promising for decluttering and organising your home.
Gemini 21 May – 20 June
Gemini, you have so many things going on that you don’t always have time to plan or be organised. It’s also not unknown for you to be indecisive and procrastinate. But you are so enthusiastic that decluttering will always be fun!
Decluttering and signs of the Zodiac – the second quarter of the astrological year
Cancer 21 June – 22 July
You’re the most emotional sign of the whole Zodiac, Cancer, and very attached to your home and relationships. If you have to organise or declutter sentimental items after a bereavement or at other times, then it may be hard going.
Leo 23 July – 22 August
Leo people, you are warm, big-hearted and love to be in the limelight. Clothes and accessories are all part of that and, as you guard your possessions closely, there could be rather a lot of clothes in the wardrobe!
Virgo 23 August – 22 September
Virgo, you are organised, prepared and a good problem solver. Does that mean you’ve got too much put by ‘just in case’? (Full disclosure: Uncluttered is a Virgo.)
Decluttering and signs of the Zodiac – the third quarter of the astrological year
Libra 23 September – 22 October
Libra, it’s no secret that you seek balance and love beauty, harmony and peace. You sometimes find it difficult to make a decision, though, and that can lead to stress. Focus on beauty when you’re decluttering.
Scorpio 23 October – 21 November
Scorpio, you know what you want and you go for it. If you’ve decided to sort out your stuff then it’s going to be pretty straightforward. Put in the time, get the job done and move on to the next thing.
Sagittarius 22 November – 21 December
Sagittarius, you prefer leave the past in the past and to focus on things that are the most important here and now. But are you decluttering as you go? Or do you just push stuff to the back of the cupboard?
Decluttering and signs of the Zodiac – the final quarter of the astrological year
Capricorn 22 December – 19 January
Capricorn, you like to be in charge of your own environment and you’re pretty organised so you probably declutter your own space as a matter of course. It is possible to overdo decluttering. I’ve known a Capricorn buy things back from the charity shop!
Aquarius 20 January – 18 February
Aquarius, you don’t like monotony and so you can be a bit unpredictable and inconsistent. Home organisation depends a lot on your mood. You’re very sociable, though, so at least declutter so your guests have somewhere to sit!
Pisces 19 February – 20 March
Pisceans! You sweet, kind idealists. Perfection may be a little way off (as it is for all of us) but you’ll make progress with decluttering one step at a time.
Can you find a spare 10 minutes in your day? Then you can declutter or tidy somewhere in your home, quickly and easily. This post lists 10 places you can declutter in just 10 minutes.
A quick tidy up is simple and makes a big difference. Take 10 minutes to clear the decks and stop clutter building up. Set the timer and work through each room, clearing the surfaces and putting stuff where it should go – junk mail in the recycling, clothes in the laundry basket, crockery in the sink or dishwasher. You can get quite a bit done in 10 minutes and you’ll feel much better about how things look.
Places you can declutter in the bathroom
Declutter those small bottles of bubble bath, hand and body lotion and soap from hotels where you’ve stayed. Yes, they remind you of holidays past but you’ve probably got photos. Toiletries do go off, you know, and they also collect dust and grime in the bathroom. Have a clean sweep. You deserve it!
Do you actually like all those mugs you’ve got in your cupboard? Are there simply too many of them? Are there some that you never, ever use because they’re chipped or downright embarrassing? Wave bye-bye to mugs you don’t like and say hello to space in the kitchen.
Photo credit: Ewen Roberts (CC BY 2.0)
Herbs and spices don’t last forever, you know, and fresh ones make your food taste so much better than stale ones. Go through your collection and throw away those with little or no smell, and those that are past their best by or use by date. Invest in new herbs and spices and taste the difference!
If you haven’t used those small packets of sugar and condiments from takeaways by now, then you probably don’t need them. Fish them out, chuck them in the bin and wipe the shelf or drawer clean. Trust me, you aren’t going to miss your mini soy sauce collection.
More places you can declutter quickly
Let’s face it: you don’t really need those old biros, bits of crayon, broken pencils and feeble felt pens. Crank up the music, sit down at the table with some scrap paper and find out what works and what doesn’t. Tip: include those pencils that will never sharpen properly because their lead is broken all the way down.
Photo credit: stu_spivack (CC BY-SA 2.0)
Is there any house without a bag of bags, often bags for life? Probably very few. Use the bags for your charity shop donations or just hand them straight over to smaller local charity shops which don’t have their own branded bags.
Declutter the bedside table so you can find things in the dark without spilling your glass of water. Give the table a dust and polish and you’ll have a much better night’s sleep.
If you love growing plants, as I do, your collection of plant pots seems to grow as well and soon becomes clutter. Luckily, more and more garden centres are recycling them. Get rid of pots which are broken, very small or an odd size or shape.